Introduction
In case you never heard about Symfony, it is a PHP framework to create websites and web applications.
It comes with over 50 reusable components that power many well-known PHP applications, such as Drupal, phpBB, and eZ Publish.
The Symfony release cycle is pretty predictable and follows a time-based model. Major versions come out every two years, while minor versions every six months. At the time of writing, the latest stable release is Symfony 5.
However, having a good framework is not enough, you still need to host your project somewhere. Symfony encourages using SymfonyCloud, which is their Platform-as-a-Service offer. This may save you some headaches, but at the same time, you may lose control of your infrastructure.
In this blog post, I would like to walk you through another approach, where we will deploy our Symfony 5 application onto the servers of the Infrastructure-as-a-Service provider of our choice.
Choosing IaaS provider
There are plenty of them, such as AWS EC2, Google Compute Engine, or Digital Ocean. They all have a strong market position and offer a wide spectrum of services. I've built a few projects based on their infra, but this time I wanted to try out something else.
I was looking for a smaller IaaS company that was established somewhere in Europe. Plus, I wanted to spin off the latest Ubuntu LTS server in a Data Center located in Europe. To my surprise, I've found an emerging IaaS player from Spain, which met all those requirements.
To give you a brief summary, Clouding.io provides cloud VPS servers based on Intel Xeon cores, 80 Gbps Cisco network and KVM OpenStack virtualization system. Their offer looks stable enough to me and includes 3x Replica, Tier 4 Datacenter quality level, and Anti-DDOS protection.
Additionally, I could tinker with their platform at no cost, because they give out a 5 EUR credit for free to everyone upon registration.
Prerequisites
If you want to follow along, here is the list of requirements:
- Clouding Account (or any other IaaS platform of your choice)
- Operating system with SSH client installed (needed to SSH into the VPS)
Moreover, the following things are nice to have:
- Base knowledge of Linux, Ubuntu
- Base knowledge of Web Servers, Apache
- Base knowledge of PHP, Symfony
Without further ado, let's start with the technical part of this tutorial.
Spinning off Ubuntu 18.04 Server on Clouding
Feel free to skip this part if you use another IaaS platform.
After signing up for the Clouding account, you can log into their panel with your credentials. Click on the Servers navigation item and then select My Servers tab, which should redirect you to the Servers List page.
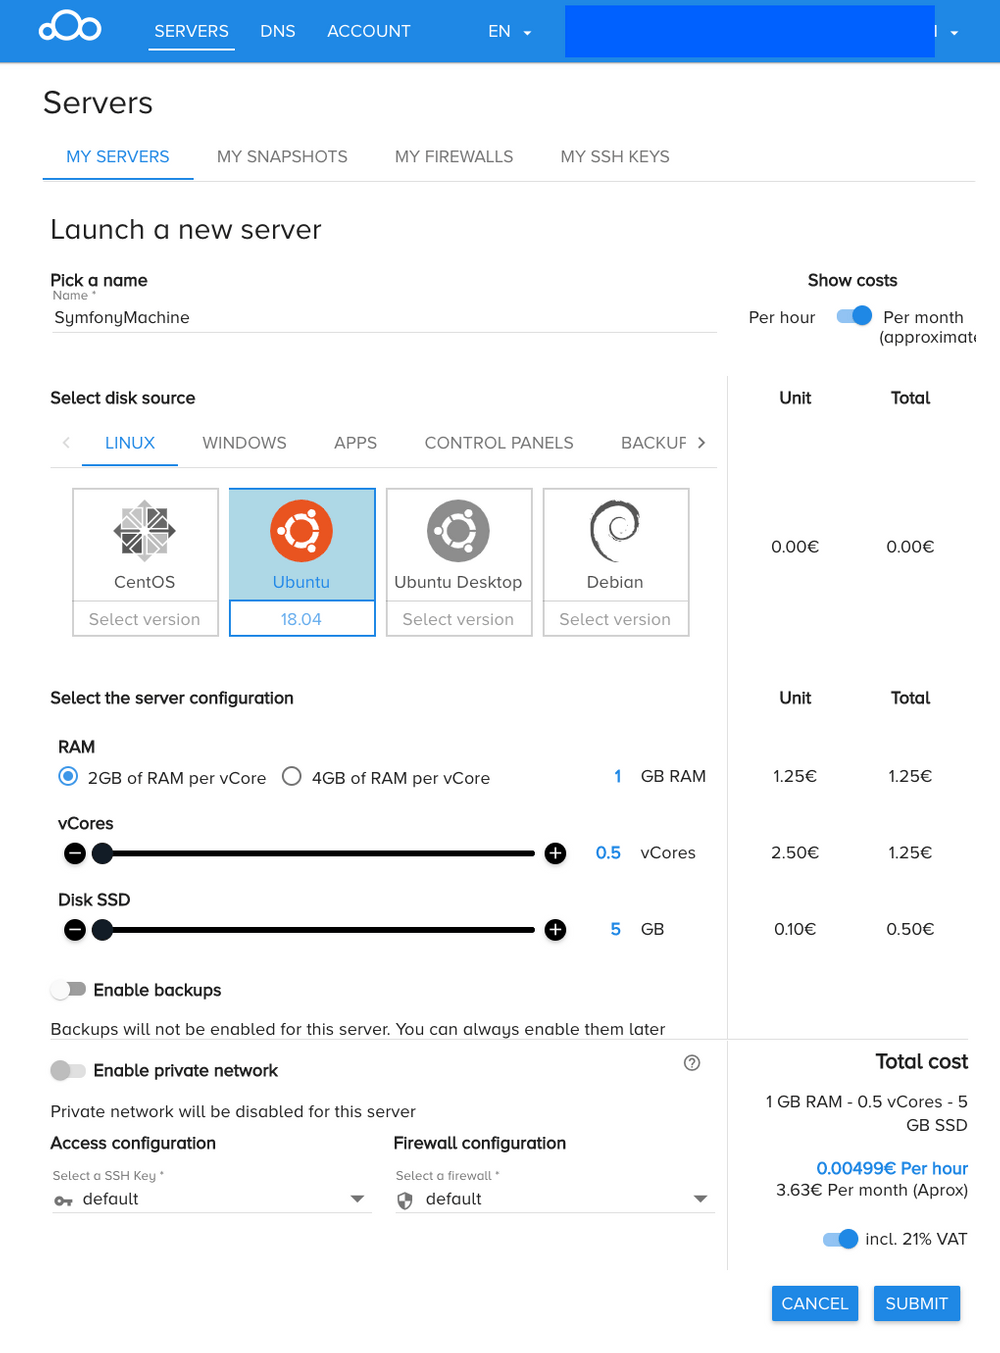
Press the "Click here to create your first server" or "Plus" button to start the Creation Wizard screen. In there,
- pick up a name for your VPS (I named mine 'SymfonyMachine')
- select the disc source (I chose Linux with Ubuntu 18.04 version)
- select the server configuration (I chose the minimal configuration of 2 GB of RAM per vCore, 0.5 vCores, and 5 GB Disk SSD)
- enable backups if needed (I left it disabled)
- configure access by selecting default SSH key or creating a new one (I picked up a default SSH key since I won't use it in this tutorial)
- configure firewall by choosing the default profile or creating a new one (I chose the default firewall profile)
If you prefer visual, here is the aforementioned configuration in the form of an image.
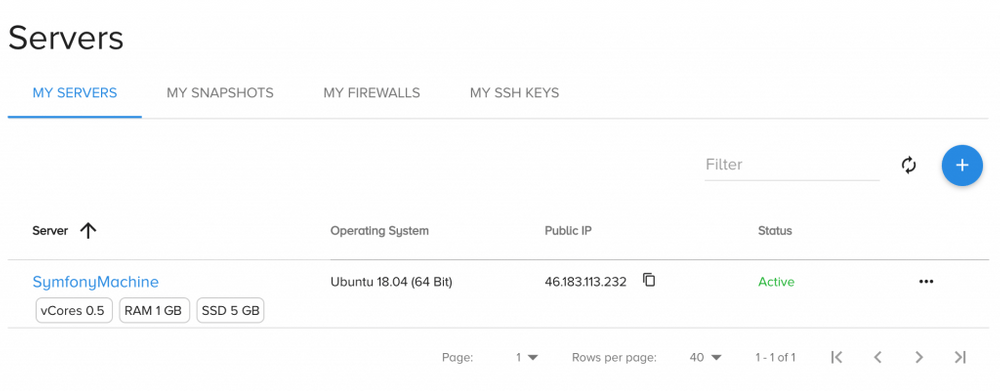
Once ready, please press the Submit button at the bottom of the page. This will start the process of creating a new VPS and you will be redirected back to the Servers List page, as shown below.
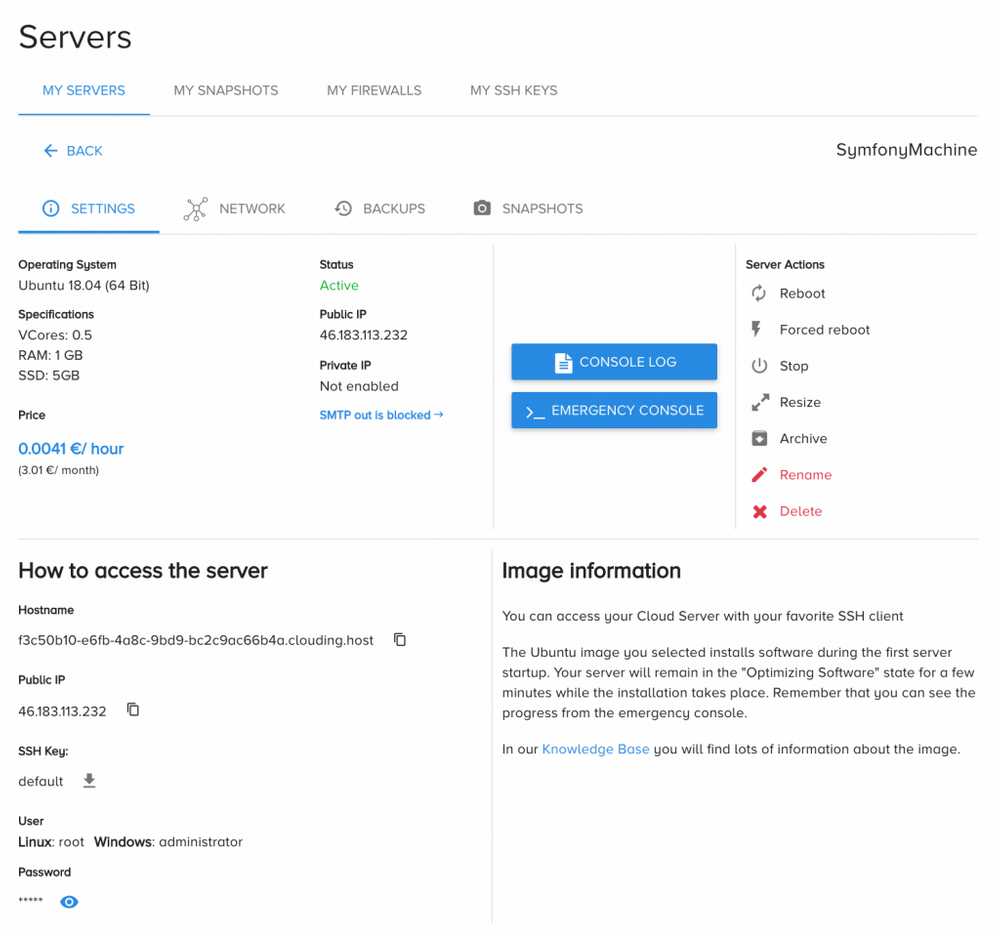
From there, click on your VPS name to go to the VPS Detail Page. Your VPS will be still spinning up, but you can already familiarize yourself with the page. The most important part is the Public IP and the Password, which is by default hidden. Those details will be also sent to you by email, once your server reaches an Active status.
At this point, we have all the needed details to SSH into newly created VPS. To do so, open the terminal on your host machine and type the following. (If you use Windows, you may need to install PuTTY first, a free SSH client)
ssh root@46.183.113.213Replace 46.183.113.213 with the IP of your VPS. As you see, I'm using my VPS root password here, but I strongly encourage you to utilize your SSH keys.
If you see something of that kind,
The authenticity of host '46.183.113.213 (46.183.113.213)' can't be established.
ECDSA key fingerprint is SHA256:DUl2RM1UUohS569dJEG/F9/Eco+fkU3VB/9Pg8/JGYA.
Are you sure you want to continue connecting (yes/no)?
please choose yes and you will never be prompted for this again on this computer. After that, use your VPS root password and you should be in your VPS console. To verify if you have the right Ubuntu system, type the following
lsb_release -a

# result
No LSB modules are available.
Distributor ID: Ubuntu
Description: Ubuntu 18.04.4 LTS
Release: 18.04
Codename: bionic
The final steps are to update the Ubuntu list of package sources with command
apt updateand then upgrade all installed packaged to their newest versions by running
apt upgrade -yThis can take up to a few minutes and you may be prompted to give an answer during some installation steps.
In case you also see
Configuration file '/etc/cloud/cloud.cfg'
 ==> Modified (by you or by a script) since installation.
 ==> Package distributor has shipped an updated version.
   What would you like to do about it ?  Your options are:
    Y or I  : install the package maintainer's version
    N or O  : keep your currently-installed version
      D     : show the differences between the versions
      Z     : start a shell to examine the situation
 The default action is to keep your current version.
*** cloud.cfg (Y/I/N/O/D/Z) [default=N] ?
Hit Enter, choosing the default option to keep your currently-installed version.
After all of that, let's quickly recap what we have until now and then move on to the next step.
- We have one VPS running on the Clouding platform with Ubuntu 18.04 LTS version
- We obtained the public IP, hostname, and root password of our VPS
- We have updated and upgraded all Ubuntu 18.04 packages
Installing PHP, Composer and other Symfony needed packages
Like every Linux system, Ubuntu 18.04 comes with some preinstalled libraries. In the case of PHP, it comes with php7.2 package and we can check it easily by running
apt show php

# result
Package: php
Version: 1:7.2+60ubuntu1
Origin: Ubuntu
Depends: php7.2
...
APT-Sources: http://ubuntu.repos.clouding.io bionic/main amd64 Packages
Description:
...
This package is a dependency package, which depends on Ubuntu's default
PHP version (currently 7.2).
With that, we can drill down to get more information about the dependant php7.2 package.
apt show php7.2 -a

# result
Package: php7.2
Origin: Ubuntu
Version: 7.2.24-0ubuntu0.18.04.3
...

Package: php7.2
Origin: Ubuntu
Version: 7.2.3-1ubuntu1
...
As we see, there are actually two available versions of php7.2 package. We can compare them with the Symfony technical requirements and may conclude we are good to go since the minimum required PHP version is 7.2.5.
I will choose another route though. We all like the newest language features, so let's install the latest stable PHP package. If you explore the PHP Changelog, PHP 7.4.0 has been released in November 2019. At the time of writing, the latest version is 7.4.2, so let's try to get this one.
To achieve it, we will use deb repositories kindly provided by Sury.org. For Ubuntu, they maintain the PHP Ubuntu Personal Package Archives, which we will install on our VPS.
apt install software-properties-common -y
add-apt-repository ppa:ondrej/php -y
apt update
Once apt finishes updating the package list, we can check again our php package with apt show php -a
It should have two versions now, one coming from Sury and one from Ubuntu.
- Version 2:7.4+72+ubuntu18.04.1+deb.sury.org+1 which depends on php7.4 package
- Old Version 1:7.2+60ubuntu1 which depends on php7.2 package
If we examine the php7.4 package with the command apt show php7.4, we see that version 7.4.2 is available. Let's proceed with the installation.
apt install php7.4It will ask if we want to install the recommended packages. Since php7.4 depends on libapache2-mod-php7.4, which in turn recommends apache2 package, then we will have PHP and Apache with mod_php up and running.
As a side note, you could actually install any other PHP version greater or equal to 7.0.
After that, we must install a few additional PHP libraries, because both Composer and Symfony need them.
apt install php7.4-xml php7.4-zip -yAt this point, we can check which versions of PHP and Apache were installed on our VPS with:
php -v

# result
PHP 7.4.2 (cli) (built: Feb  5 2020 16:50:38) ( NTS )
Copyright (c) The PHP Group
Zend Engine v3.4.0, Copyright (c) Zend Technologies
    with Zend OPcache v7.4.2, Copyright (c), by Zend Technologies
apache2 -v
# result
Server version: Apache/2.4.29 (Ubuntu)
Server built: 2019-09-16T12:58:48As a matter of fact, if you visit your Public IP address now, you should see a default Apache2 page. We will change it after we install the Symfony application. But for now, let's install a Composer package manager, by following its official guide.
php -r "copy('https://getcomposer.org/installer', 'composer-setup.php');"
php composer-setup.php --install-dir=/usr/local/bin --filename=composer

# You can also verify the SHA-384 and remove the installer, as described in the guide
This was the last step of this chapter, so let's review what we have achieved so far
- we installed the PHP 7.4.2 version utilizing Sury Ubuntu PPA
- Apache 2.4 with mod_php has been installed automatically for us
- we downloaded and installed Composer package manager
It looks like we have all prerequisites to boot up the first Symfony 5 applications, so let's get into the last two chapters together.
Installing Symfony 5 application to verify the provisioned VPS configuration
Symfony Setup Guide recommends two ways of creating a new application:
- with the use of Symfony binary
- with the use of composer
It also provides two types of Symfony applications
- a traditional web application
- microservice, console app or API
In this tutorial, I will use the Composer to scaffold a traditional web application
cd /var/www/
composer create-project symfony/website-skeleton symfony5app
cd symfony5app

# this will output Symfony version and other information
./bin/console about
Let's also scaffold a Symfony Controller to see how various routes are working together.
/bin/console make:controller TestControllerHaving all of that, let's configure the Apache2 webserver to run our Symfony 5 application.
Apache2 configuration for Symfony 5 using mod_php
Symfony Web Server Guide presents a plethora of ways to configure the Symfony applications on the Web Server. In this tutorial, I will choose the easiest route and set up Apache2 with mod_php.
cd /etc/apache2/sites-available/

cat > 001-symfony5app.conf <<EOF
<VirtualHost *:80>
   ServerName symfony5app

    DocumentRoot /var/www/symfony5app/public
    DirectoryIndex /index.php

    <Directory /var/www/symfony5app/public>
        AllowOverride None
        Require all granted

        FallbackResource /index.php
    </Directory>

    <Directory /var/www/symfony5app/public/bundles>
        FallbackResource disabled
    </Directory>

    ErrorLog /var/log/apache2/symfony5app_error.log
    CustomLog /var/log/apache2/symfony5app_access.log combined
</VirtualHost>
EOF
Having that, we must disable the default site configuration and enable ours.
a2dissite 000-default.conf
a2ensite 001-symfony5app.conf
And lastly, reload the Apache2 webserver to put our changes into action.
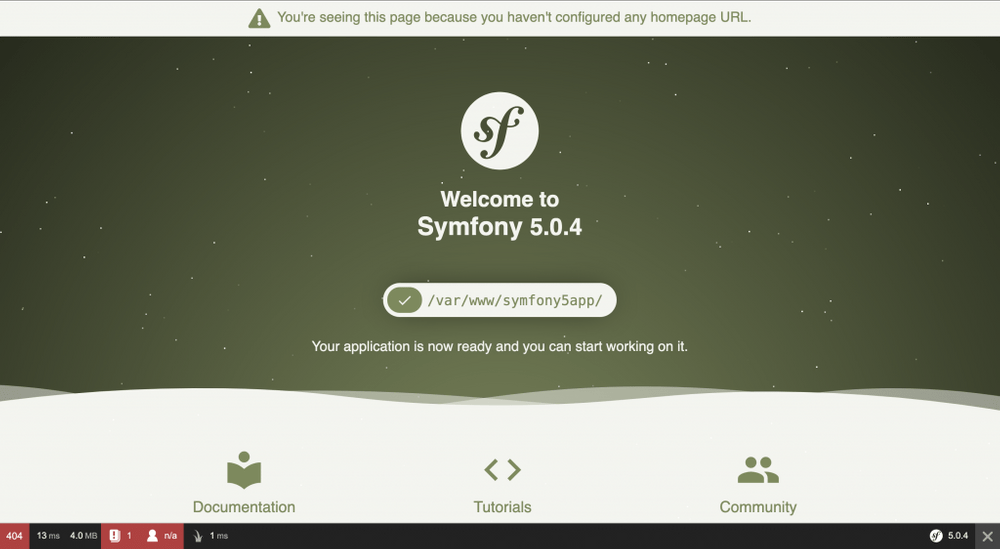
systemctl reload apache2If you visit your Public IP now, you should see the Symfony 5 welcome page, as shown below.
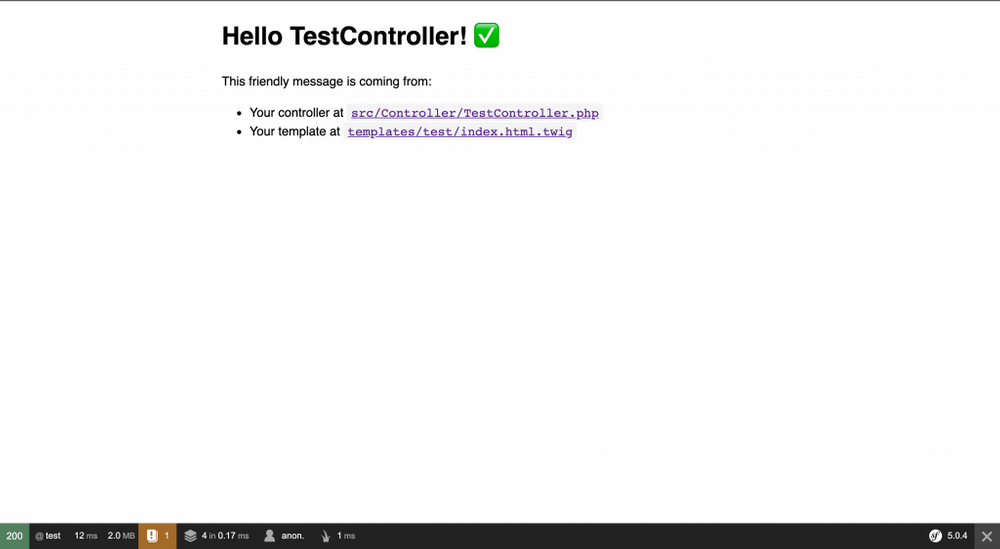
And if you open the /test URL, you should see the scaffolded Test Controller in action.
As a side note, you've probably noticed that the Web Debug Toolbar is visible on both screenshots. If you deploy Symfony application to production, you should follow specific guidelines to make it secure and performant. This tutorial was not meant for that, but if this interests you, I can write another blog post soon.
Summary
We have achieved a lot together. We started with spinning off Ubuntu 18.04 VPS on the Clouding platform. Then we SSH into our VPS and installed the latest PHP 7.4 and Apache 2.4 libraries. After that, we took care of Composer package manager. And in the end, we scaffolded the most basic Symfony 5 application and saw it running in the browser.
However, this only touched the tip of the iceberg. There are a lot of options and solutions out there, basically at every step of this process. We didn't discuss here the best practices for deployment, security, or server provisioning. We didn't do anything related to Infrastructure-as-a-Code or dwelt into containerized solutions.
I hope I've helped you broaden your understanding of server provisioning and whet your appetite for more complex configuration. I tried to include several links to good practices and industry standards, where you can explore more on your own.
I'm considering to write more tutorials covering the following topics, so please let me know if any of them interests you.
- preparing and deploying Symfony 5 application to production
- learning how to write Ansible playbooks to provision any VPS
- exploring how to use Docker and Docker Composer to spin off a few containers on one VPS
Attribution
Cover Photo by Alex Machado
